
This lovely scarf is perfect for those festive
parties at this time of year, and is an
impressive accessory to wear. Knit with
ultra-soft bamboo yarn, this scarf has
incredible drape, while being warm and
light-weight to wear. With the season of
gift-giving just around the corner, why not
pamper yourself or someone you love with
the ultimate present – White Diamonds!
You can also download this pattern
in a pdf file by clicking here.
Photo credit [model - Double Delight rose (hee hee!);
photographer – Rachel Leverton]
FINISHED MEASUREMENTS:
Width:8 inches
Length: 60+ inches
MATERIALS:
Plymouth Yarn Royal Bamboo
[100% Bamboo; 93yd/m per 50g skein]; color: vanilla or white;
4 skeins
1 set(s) US 3/3.25mm straight needles
2 stitch markers
GAUGE
24 sts/32 rows = 4" in stockinette stitch
PATTERN NOTES
It is helpful to put a stitch marker between the different sections of the charts. The different
sections in the chart are divided by a thick line, and stitch markers should be placed at each
division.
PATTERN
Diamond Lace Edging (make 2): CO 16 stitches, and work chart A 2 times, then rows 1-14 once
more. BO and finish off.Begin Scarf:
Pick up and knit 43 stitches from left
(straight) edge of one of the lace
edgings. Turn and purl next
row. Work chart B until scarf measures
60 inches, or desired length (Note: it is
not necessary to knit to the end of the
chart to finish the scarf, but you should
end on a WS row). BO and finish off.
Join second lace edging to the other end
of the scarf with mattress stitch.
FINISHING
Weave in all ends and block.
NOTE: To better view the
charts, click on them to
enlarge and then print them
out.
Sunday, March 23, 2008


Monday, December 10, 2007
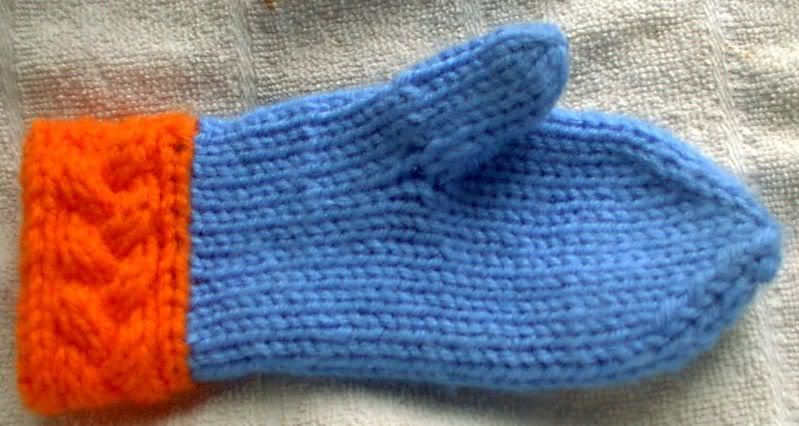
Extra-Toasty Toddler Mittens
 Our winter climate in the Frigid North can get pretty cold, so I found that regular knitted mittens just weren't enough to keep my little one's fingers nice and warm while playing in the snow. (We won't even talk about the ineptness of store-bought mittens . . .). These mittens are knitted with two strands of yarn at once, so they're doubly thick and warm. I'd recommend knitting an I-cord or crocheting a length of yarn and attaching the mittens together so they don't get separated.
Materials:
1 skein of worsted weight yarn (I prefer Caron Simply Soft). You will need to use two strands, so either separate into two separate balls, or use a strand from the center as well as the outside of the yarn ball.
4 US size 8 double pointed needles
Small stitch holder (I just use a piece of string)
Gauge: 16 stitches = 4 inches (remember that you're working with two strands of yarn, so although the gauge may look wide for a toddler's wrist, it's also extremely thick.)
Size:
4.5 (5.5) inch wrist
 With a loose cast on, such as the German Long-tail or Long-tail, CO 20 (24) stitches using TWO strands of yarn. Divide stitches onto the double pointed needles as follows: 5 (6) stitches on Needles #1 and #3, and 10 (12) stitches on Needle #2. Place marker for working in the round. Work K1, P1 ribbing for 3 ½ inches.
Palm for Left Hand:
Switching to stockinette stitch, work for 1 (2) inch(es). Then, knit across to last stitch on Needle #1. Place last 3 (4) stitches worked on a stitch holder, K1. Knit across Needles #2 and #3. On the next round, on Needle #1, K1, CO3 (4), K1. Work across all needles, and continue working stockinette until mitten reaches 7 (8) inches from cuff bottom.
Palm for Right Hand:
Switching to stockinette stitch, work for 1 inch. On next round, knit across Needles #1 and #2. On Needle #3, K4, place last 3 (4) stitches worked on a stitch holder, K1. Knit across Needles #1 and #2. On Needle #3, K1, CO 3 (4), K1. Continue working stockinette until mitten reaches 7 (8) inches from cuff bottom.
Closing:
Round 1: On Needle #1, K to within 3 stitches of the last stitch. K2tog, K1. On Needle #2, K1, SSK, knit to within 3 stitches of last stitch, K2tog, K1. On Needle #3, K1, SSK, knit the remaining stitches.
Round 2: Knit across all needles
Continue rounds 1 and 2 until there are 8 stitches remaining on the needles. Join stitches from Needles #3 and #1, and close with Kitchener stitch.
Slip 3 (4) stitches from the stitch holder onto first needle. With second needle, PU and K 1 stitch from side edge, and 2 (3) stitches from CO edge. With third needle, PU1 stitch from CO edge and 1 stitch from side edge (8,10 stitches). Work stockinette in the round for 2 (2.5) inches. To close, leave a 12 inch tail, and weave through all stitches on the needles. Pull firmly to shut, knot, and finish off.
~ this is a free pattern from DutchOrchid Designs. If you knit this pattern, please leave a comment on her blog.
Saturday, June 9, 2007

 I am of the snooty opinion that crocheted items should look crocheted, and knitted items should look knitted. I realize that there are other Feather and Fan sock patterns on the web, but they didn't appeal to me, as they had a vaguely disturbing crocheted look to them (no offense to the excellent author of the pattern). This pattern fixes that "problem".
The modified Feather and Fan stitch pattern I have used here is excellent for showing off self-striping sock yarn, and even has a bit of lace in it! The easy stitch pattern continues down the heel flap, making it perfect for clogs or open heeled shoes. Also, I have included options for a regular shaped toe or a split toe (for those flip-flop fiends!)
Wear these with a pair of your favorite jeans, and won't you be the stylish knitter! Why hide hand-knitted socks under old tennis shoes - flaunt your fiber art skills with flip-flops!
You can also download this pattern in pdf format by clicking here.
~ ~ ~ ~ ~

Materials:
4 US size 1 double pointed needles, 300-350 yards of self-striping fingering weight yarn (pattern was knitted with Lion Brand's Magic Stripes yarn), 1 darning needle, 2 stitch holders (small holders work best, or a long piece of yarn will do nicely).
Gauge: 40 stitches = 1 inches in K1, P1 ribbing, or 36 stitches = 4 inches in Feather and Fan pattern. (NOTE: I prefer snug socks, so you might want to try a size 2 or 3 needle if you think you'd like your socks a bit more loose. The gauge I chose should comfortably fit a 9 inch ankle.)
CUFF:
CO 72 stitches. Divide stitches on 3 needles, 36 stitches on needle #1 and 18 stitches on needles #2, and #3. Work in K1, P1, ribbing around for 3 rows. Begin Feather and Fan pattern as follows:
Row 1: *(K2tog) 3 times, (K1, YO) 6 times, (K2tog) 3 times.* Repeat from * to * 4 times.
Rows 2 - 4 (WS): Knit
Repeat rows 1 – 4 until sock cuff measures desired length, usually 4 – 6 inches.
HEEL FLAP:
Work heel flap on needle #1 only.
Row 1: *(K2tog) 3 times, (K1, YO) 6 times, (K2tog) 3 times.* Repeat from * to * 2 times. Turn.
Rows 2 - 4 (WS): Knit. Turn.
Repeat rows 1 and 2 five times.
TURN HEEL:
Row 1: Sl1, K19, K2tog, K1. Turn.
Row 2: Sl1, P5, P2tog, P1. Turn.
Row 3: Sl1, K6, K2tog, K1. Turn.
Row 4: Sl1, P7, P2tog, P1. Turn.
Row 5: Sl1, K8, K2tog, K1. Turn.
Row 6: Sl1, P9, P2tog, P1. Turn.
Continue in this fashion, increasing 1 stitch after each slipped stitch, until row 15 (WS; 22 stitches on the needle). Then, Sl1, K20, K2tog. Turn. P19, P2tog. Turn. Sl1, and knit across.
GUSSET:
With free needle, pick up and knit 18 stitches from left edge of heel flap. Combine stitches from needles #2 and #3 onto one needle, and [*(K2tog) 3 times, (K1, YO) 6 times, (K2tog) 3 times.* Repeat from * to * 2 times] across. With free needle pick up and knit 18 stitches from other side of heel flap, and (using same needle) knit 10 stitches from next needle. Transfer remaining stitches to the next needle, which is now needle #1 (92 stitches).
Row 1: K around all needles.
Row 2: K across to last three stitches, K2tog, K1. K across needle #2. On needle #3, K1, SSK, K across needle.
Row 3: K around all needles.
Row 4: K across to last three stitches, K2tog, K1. On needle #2, [*(K2tog) 3 times, (K1, YO) 6 times, (K2tog) 3 times.* Repeat from * to * 2 times] across. On needle #3, K1, SSK, knit across.
Repeat rows 1 – 4 until 72 stitches remain. Then, K across needles #1 and #3, and continue following stitch pattern on needle #2 until foot reaches the gap between big toe and middle toe.
TOE SHAPING (Regular toe):
Row 1: Knit across to last three stitches, K2tog, K1. On needle #2, K1, SSK, knit across to last three stitches, then K2tog, K1. On needle #3, K1, SSK, knit across.
Row 2: K around.
Repeat rows 1 and 2 until there are 16 stitches left. Combine stitches from needles #2 and #3 onto one needle, and join the stitches on the two remaining needles with kitchener stitch.
TOE SHAPING (Split toe, right foot):
Row 1: Knit across to last three stitches, K2tog, K1. On needle #2, K1, SSK, knit 21. Place remaining 12 stitches on Needle #2 to a stitch holder (a piece of yarn works well). On Needle #3, place 12 stitches to another stitch holder. Transfer a few stitches from Needle #1 onto Needle #3 (doesn't really matter how many) and knit across Needle #3.
Row 2: Knit around.
Row 3: Knit across to last three stitches on Needle #1, then K2tog, K1. On Needle #2, K1, SSK, knit across needle. Knit needle #3.
Repeat rows 2 and 3 until there are 20 stitches left. Place stitches from needles #3 and #1 onto one needle, and close opening with kitchener stitch.
Big Toe: Slip stitches from two stitch holders onto three needles (8 per needle). Join yarn at edge of sock and knit around until the gap between the big toe and the rest of the toes. Pick up a stitch from the corner, then pick up a stitch from the other corner (so there's not a big hole in between your toes). Knit around until toe is 1/4 inch shorter than desired length. K2tog around once. K around next row. K2tog around to last stitch, knit last stitch. Cut a 6 inch tail and weave through stitch loops. Finish off.
TOE SHAPING (Split toe, left foot):
Row 1: Knit 6, place next 12 stitches from Needle #1 onto stitch holder, then 12 stitches from Needle #2 onto another stitch holder. Knit remaining stitches on Needle #2 until last three stitches, then K2tog, K1. On Needle #3, K1, SSK, knit across needle.
Row 2: Knit around.
Row 3: Knit Needle #1, on Needle #2, knit to within last three stitches, then K2tog, K1. On Needle #3, K1, SSK, knit across.
Repeat rows 2 and 3 until there are 20 stitches left. Combine stitches from Needles #3 and #1 onto one needle, and sew toe closed with kitchener stitch. Knit big toe same as for left foot.
This pattern is the property of DutchOrchid Designs, and is not meant to be resold.
Kindly leave a comment at http://dutchorchiddesigns.blogspot.com if you knit this pattern.
Sunday, April 22, 2007


Saturday, April 21, 2007
Little Lady's Lacy Socks

Size: 12-18 months(2T, 3T). Instructions are for smallest size, with larger sizes in parenthesis. When one number is given, it applies to all sizes.
Gauge: 6 stitches per inch
Materials: 100 yds. of sock weight yarn (pattern was knitted with Lion Brand's Microfiber), 4 US size 3 double pointed needles, large darning needle
 Picot Cuff: CO 30(36, 42) stitches. K around for 4 rows. Picot row as follows: *K2tog., YO* repeat from * to * around once. K around for 4 rows again. Fold first 4 knitted rows down on the inside of the sock; Loosely K around once while also catching one stitch of the CO row with each knitted stitch. Work sock cuff as follows:
Row 1: (eyelet row): *K3tbl, YO, (Sl1, K2tog. PSSO), YO*. Repeat from * to * around
Rows 2-4: *K3tbl, K3*. Repeat from * to * around
Continue rows 1 - 4 until sock cuff is desired length, usually 2(3,4) inches. Work heel flap as follows:
Heel Flap: Place 14(18,20) stitches on Needle #1. Work back and forth on Needle #1 to work heel flap.
Row 1: (RS) *Sl1 purl-wise, K1*. Repeat from * to * across Needle #1. Turn.
Row 2: (WS) Sl 1 knit-wise, P across
Repeat these rows 14(18,20) times, ending with a RS row. Work heel as follows:
Heel:
(WS) P7, P2tog., P1. Turn.
(RS) Sl1, K 3, K2tog. K1. Turn
(WS) Sl1, P4, P2tog. P1. Turn. Continue in pattern, increasing one more purl or knit stitch after each slipped stitch, until all stitches have been worked, ending with a RS row. Work the gusset as follows:
Gusset: Using the free needle, PU and knit 7(9,10) stitches from heel flap edge. Combine stitches from Needles #2 and #3 onto one needle. K across, continuing pattern as established in cuff. PU and knit 7(9,10) stitches on next heel flap edge, and then knit half of the stitches from Needle #1. Place the remaining stitches from Needle #1 onto the next needle. This needle now becomes Needle #1.
Row 1: K Needle #1. Work across Needle #2, continuing pattern as established in cuff. K needle #3.
Row 2: K Needle #1 to last three stitches, then K2 tog., K1. Work across Needle #2, continuing pattern as established in cuff. On Needle #3, K1, SSK, K the rest of the needle.
Continue rows 1 - 2 until there are 30 stitches on the needles. Then, knit across Needles #1 and #3 and continuing pattern on Needle #2 until foot measures 4(5 1/2, 6 1/2) inches. Work toe as follows:
Toe:
Row 1: On Needle #1, K to last 3 stitches, then K2tog., K1. On Needle #2, K1, SSK, K to last 3 stitches, K2 tog., K1. On Needle #3, K1, SSK, K across needle.
Row 2: K around
Continue rows 1 - 2 until there are 8(8,12) stitches left. Then, (for size 12-18months and 3T only) work 1 row as follows: K across Needle #1. On Needle #2, K1, SSK, K to last 3 stitches, K2tog., K1. Knit across Needle #3.
To finish, knit stitches from Needle #1 onto Needle #3. Close toe with Kitchener Stitch.
 This pattern is the property of DutchOrchid Designs.
If you knit this pattern, please leave a comment on her blog.
http://alohaknitter.blogspot.com or
http://dutchorchiddesigns.blogspot.com
http://alohaknitter.blogspot.com or
http://dutchorchiddesigns.blogspot.com
Friday, April 13, 2007
Ladies Braided Mittens
Materials: US size 6 double pointed needles, approximately 150 yds. worsted weight yarn (pattern was knitted with Patons SWS), large darning needle, cable needleCuff: CO 33 stitches. Work in K2, P1 ribbing for 3"
Palm: Place 16 stitches on needle #1, 8 stitches on needle #2, and 9 stitches on needle #3.
Rows 1-3:
* Needle #1: K4, P1, K6, P1, K4
* Needles #2 and #3: K across
Row 4: K4, P1, C4F, K2, P1, K4. K across needles #2 and #3
Rows 5 - 7: Repeat rows 1 - 3
Row 8: K4, P1, K 2, C4B, P1, K4. K across needles #2 and #3
Continue rows 1 - 8 for 3", or until mitten reaches the crook of the thumb.
Left Thumb: On needle #2, K to last stitch. Place six previously knitted stitches to a stitch holder (an extra piece of yarn is convenient for this). K last stitch. Continue around in braided pattern on needle #1 and K across needle #2. On needle #3, K2, CO 5, K1.
Right Thumb: On needle #2, K7. Place last six previously knitted stitches to a stitch holder. Continue around in braided pattern until needle #2, then K1, CO5, K2.
Mitten: Continue in stockinette stitch and braided pattern until mitten reaches 1 1/2" from longest fingertip.
Closing Row 1: On needle #3, K to last 3 stitches, K2tog., K1. On needle #1, K1, SSK, K to last 3 stitches, K2tog. On needle #2, K1, SSK, K across.
Closing Row 2: K around once (continuing braided pattern)
Repeat rows 1 and 2 until there are 12 stitches left. Place 6 stitches on needle #1, and combine stitches from needles #2 and #3 to one needle. Close with kitchener stitch.
Thumb: K 6 stitches from holder. PU one stitch in the corner, PU 5 stitches from CO row, PU one stitch in the corner. K around for 2 1/2". To close, K2tog. around until last stitch. K last stitch and finish off.
Pattern by Rachel (http://alohaknitter.blogspot.com)
please leave a comment on her blog if you knit this pattern
please leave a comment on her blog if you knit this pattern
Thursday, April 5, 2007
Toddler's Braided Mittens
* Materials: 4 US size 7 double pointed needles, cable needle, large darning needle, and 1 1/2 - 2 oz. worsted weight yarn in one or two colors (project was knitted with Red Heart yarn)
* Special Definitions:
C4F: Place two stitches on cable needle and hold to front. K2 stitches, then K2 from cable needle
C4B: Place two stitches on cable needle and hold to back. K2 stitches, then K2 from cable needle
*Braided Band: CO 12 stitches with provisional CO on one of the double pointed needles. Work back and forth on this needle as follows:
Row 1: K2, P1, K6, P1, K2
Row 2: P2, K1, P6, K1, P2
Row 3: K2, P1, C4F, K2, P1, K2
Row 4: Repeat row 2
Row 5: K2, P1, K2, C4B, P1, K2
Row 6: Repeat row 2
Repeat rows 1-6 until band measures 5 1/2". Remove provisional thread and attach first row to the last row with Kitchener stitch.
* Palm: With right side of Braided Band facing and using all three double pointed needles, PU 25 stitches around the top of the band. (NOTE: PU stitches in the space between the two knitted rows of Braided Band to insure Band does not separate from the mitten). K around until piece measures 2 ¼” from top of Band, or to the crook of the thumb.
* Thumb Hole: Place 7 stitches on Needle #1, 12 stitches on Needle #2, and 6 stitches on Needle #3. On Needle #1, K to within last stitch. Place last 4 knitted stitches on a stitch holder (a piece of yarn works well), and K last stitch. K across Needles #2 and #3. On Needle #1, K2, CO 3, K1 (6 stitches on Needle #1). (Right Mitten) Place 6 stitches on Needle #1, 12 stitches on Needle #2, and 7 stitches on Needle #3. K across Needles #1 and #2. On Needle #3, K5, place last 4 knitted stitches on a stitch holder, K remaining stitches. K across Needles #1 and #2. On Needle #3, K1, CO 3, K2 (6 stitches on Needle #3).
* Main Mitten: K around until mitten measures 4 ¼” from Braided Band. Begin decreasing as follows:
Row 1: On Needle #1, K to last three stitches, K2 tog., K1. On Needle #2, K1, SSK, K to last three stitches, K2 tog., K1. On Needle #3, K1, SSK, K remaining stitches.
Row 2: K across
Repeat rows 1 and 2 until there are 4 stitches remaining. Combine stitches from Needles #1 and #3 onto one needle. Sew opening closed with Kitchener stitch.
* Thumb: Place 4 stitches from stitch marker onto needle. Using all three needles, PU 2 stitches from corner, PU 3 stitches from CO row, PU 2 stitches from corner. K4, K2 tog., K3, K2 tog. (9 stitches on needles). K around until thumb measures 1 ½”. (K2 tog.) 4 times, K1. Cut yarn, leaving a 6” tail for sewing. Using Yarn Needle, thread the tail through the remaining stitches. Finish off.
Pattern by DutchOrchid Designs
http://dutchorchiddesigns.blogspot.com
http://dutchorchiddesigns.blogspot.com
Subscribe to:
Posts (Atom)
